Presumably a set of pretty manicure is every girl's dream! But not everyone is born with beautiful and healthy nails. If you have short, dull, brittle or bitten nails, then you may need a little nail enhancement in your life.
You probably heard of some people using acrylic or gel nail extension tips to lengthen and strengthen their nails and ultimately helping their polish to last longer. Both of them are the most popular ways to get longer and sexier nails. However, acrylic nails come with not-so-satisfying parts like the strong smell, the nail breaking, the painful removal process, and they can damage your natural nails if they're done incorrectly. Gel nails are safer and healthier than acrylic nails, they have an easier and quicker removal process. If you're looking for a nail extension system which provides light-weight, easy to apply, dust-free and can be easily removed without damage, a better option might be gel nail tips.
If you’re new to getting gel nail extensions, you would be confusing about how they all worked. Please don't worry, today we put together everything you need to know about UV soft gel nail tips, including what are gel nail tips, what's the difference between acrylics and gel extension tips, how to choose and apply gel nail tip extension. Please keep scrolling.
What are gel nail tips?
Gel nail tips are pre-shaped artificial nails, which look like a fake nail and are attached to the natural nail to extend its length. They are normally either clear or white. Soak-off nail tips come in different sizes, length and shapes like stiletto, round, coffin, square, etc.
What is the difference between gel tips and acrylics?
Though the two types of nail enhancements look similar at a glance, there are big differences on them. Acrylics are mixed with a liquid monomer and a powder polymer that form a paste which is attached to the natural nail. They are shaped onto your nails with a brush, and then air-dried. Acrylics do not require a UV or LED lamp to cure, and they're great for changing the shape or extending your nails. But acrylics come with strong odors, the application and removal process are difficult for nail beginners. And improper handling will damage or weaken your natural nails.
Gel tips are made of plastic and requires a UV or LED light to cure. As strong and long-lasting as acrylics, gel extensions tend to be thinner and look more natural, like gel — almost like they're your own nails. There are plenty of benefits, including no damage to your natural nails, no strong odors, and no major shaping or filing, they are quicker and easier to apply and remove than acrylics. Gel nail tips are beginner-friendly, you can apply them at home in a few seconds. A salon-style manicure has never been easier.
At Vettsy, we provide a wide selection of gel nail tips to choose from. Made with soft gel, our full cover gel nail extension tips are light-weight, easy to apply and remove, flexible and durable, they can last over 3 weeks with proper preparation. Then what kind of nail tips should you get?
How to choose the correct false nail tips?
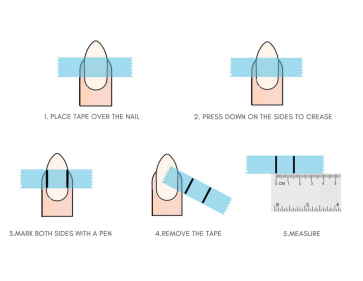
1. Correct size
When selecting fake nail tips, the first priority is the size issue. If the size does not match your natural nails, it can easily fall off. Please use tape to measure the width at the widest point of your nail. Make a note of the numbers and use the same way to measure the rest nails.Then compare the numbers you measured with the gel tips sold on our website.We all have small numbers embossed on the back of the false nail tips so you can easily find out which size is best for you - noticing them and remembering your size can save you a lot of time. If your nail size is in between, we recommend that you choose the larger one.
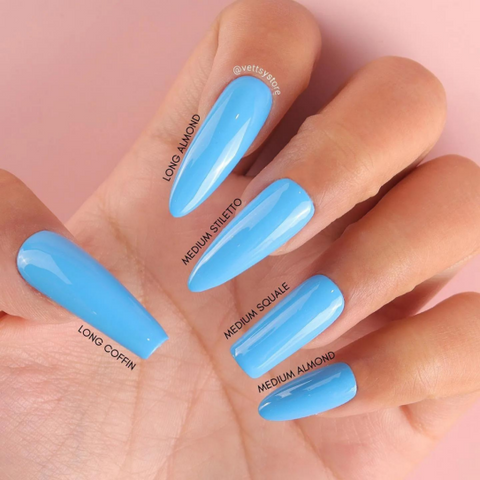
2. Nail Shapes
Nail gel tips most commonly come in different shapes. From more traditional shapes like round or square to more advanced shapes like stiletto or coffin, here at Vettsy, you can choose the desired nail shape according to your own preferences.
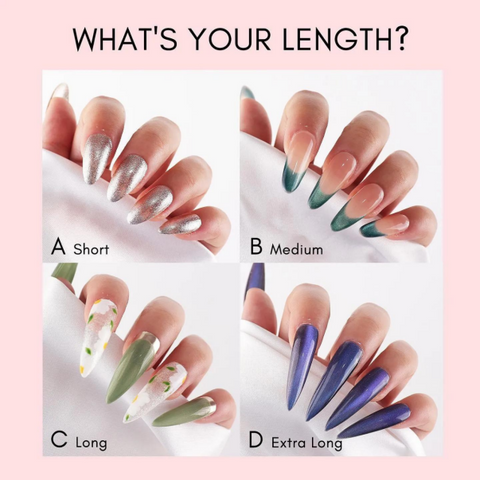
3. Length
The length of the nails can be chosen according to your actual needs. You can refer to this picture.
The thickness of the tip is also important. Thicker tips tend to be stronger, while thinner tips are more flexible. To get strong, permanent nails, it is important to choose tips with durability and flexibility. Vettsy gel nail tips have an ultra-thin cuticle area which makes them more comfortable to wear and a thicker nail plate and free edge to be break-resistant.
By the way, if your nails are too flat, we recommend using solid nail glue to stick the fake nail tips. Its consistency is a little bit like rubber, so it can fill the gap between the gel tips and the nail surface, and it can also be shaped, which can perfectly solve this problem for you.
Once you've chosen the right fake gel tips and have all the tools you need ready, you can start applying the false tips. Please follow this tutorial if you are not very skilled.
How to Apply Nail Tips at Home?
Step 1: Find the right tips size. The width of the tip should fit from sidewall to sidewall for proper strength and structure. Please remember when sizing your tips is to always oversize.
Step 2: Prep the nails. Wash your hands and push back cuticle with cuticle pusher. Trim dead cuticles, and buff your natural nails to a matte state and remove the dust. If there is grease residue, it will affect the stickiness of the nail glue.
Step 3: Apply dehydrator and primer to natural nails. Nail prep dehydrator makes your natural nails clean and dry, and acid-free primer makes gel polishes adhere to your nails firmly and gives your manicure long-lasting and non-chipping.
Step 4: Apply a base coat to protect your natural nails and cure for 30s.
Step 5: Use solid nail tips glue or nail tip adhesive gel to stick false nail tips to your natural nails and cure for 60-90S. You can adjust the position of the gel tip before curing. Repeat on all fingers.
Step 6: Create your nail design now.
To remove gel extensions, you should file down about 85% of the extension and soak off the remaining gel in acetone wrap with aluminum foil, or use Vettsy ready made acetone wrap. Wait 15 minutes and your natural nails will look healthy at the end of the process.


