The Hottest Trend: What is Cat Eye Gel Polish?
The "cat eye nails" trend has absolutely swept social media, captivating nail art enthusiasts everywhere! Have you ever been drawn to those stunning cat eye effects of shimmer that move with the light? It mimics the mysterious, slitted pupil of a feline, giving your manicure an instantly galactic and luxurious feel.
So, what makes it magic?
It's all thanks to magnetic gel polish (the official name for cat eye gel!). This polish contains colorful, magnetized micro-particles. When you hover a special magnet over the wet gel, these tiny particles instantly gather and create those unique, dimensional shimmer patterns.
🌈 Find Your Vibe: 5 Types of Magnetic Cat Eye Gels
Choosing the right cat eye gel polish can be overwhelming! Think of magnetic gel as an upgraded, super-dynamic version of glitter polish. So how to choose a cat eye gel that suits you best? To help you navigate the options and find the perfect match for your style, we've broken down the 5 main types. After knowing more about them, your difficulty in choosing magnetic gels can be easily solved. Let's dive in! You can also get everything about the cat eye gel polish here quickly.
1. Cat Eye Gel With A Silver Effect: The Universal Layering Base

2. Cat Eye Gel With A Holographic Effect: Shiny Like Rainbow

3. Cat Eye Gel Infused With Glitters Or Opal: Bring Your Nail Galaxy Textures

4. Cat Eye Gel With Multiple Colors: Experience The Charm of Color-Shifting Nails

5. Cat Eye Gel With Ultra-Fine Powders: Fall In Love With The "Velvet" Finish

🛠️ Get Started: Essential Tools for the Perfect Cat Eye Manicure
Before diving into the application, you need the right gear! Don't let your efforts go to waste with a weak magnet.
Here's your essential toolkit:
- Base Coat
- Color Gel Polish (For your base color, usually black or a dark shade works best!)
- Your Chosen Cat Eye Gel Polish
- Gel Top Coat
- UV/LED Lamp (Curing power is key!)
- The Right Magnet! (A regular refrigerator magnet won't work—you need a strong nail art magnet.)

💅How to Apply Cat Eye Gel Polish (Step-by-Step Guide)
Ready to create that mesmerizing look? Follow these detailed steps to master the cat eye effect at home.
Step 1: Clean, file, and buff your natural nails. Remove the cuticles.
Step 2: Apply a layer of base coat and cure for 60 seconds under your lamp.
Step 3: Apply your chosen base color (if desired) and cure it for 60 seconds. (A dark base helps the shimmer pop!)
Step 4: Fully shake the cat eye gel. Apply a medium-thick coat to one nail. DO NOT CURE YET! Immediately hold your chosen magnet as close as possible to the nail surface (without touching it!) and move it to create a cat eye effect. Watch the magic effect appear!
Step 5: Then cure the nail under the UV/LED lamp for 60 seconds to lock the particles in place. Pro-Tip: Do one nail at a time to prevent the magnetic particles from dissipating.
Step 6: Seal your stunning design with a gel top coat and cure fully.

How to use different cat eye magnets for different effects?
Different magnets can create various cat eye effects. And it depends on how you use the magnets. The magnet for cat eye gel polish has many shapes, including flowers, round, square, cylindrical, and so on. Keep reading, and you will find the magnet and design you like best!

1. The All-Rounder: Magnetic Cylinder Wand

Small but mighty, this cylinder magnet is widely considered the most versatile tool in your kit. It is the secret behind the trending "wide", "chasing light", or "ARC" cat eye look. It is also perfect for creating soft ombre cat eye designs. Before curing the cat eye gel, move this cylindrical magnet back and forth along the sides of the nail. The magnetic particles in the cat eye gel will react to the magnet, creating different cat eye effects. If you only buy one magnet, make it.
2. The Stabilizer: Rectangular Magnetic Bar

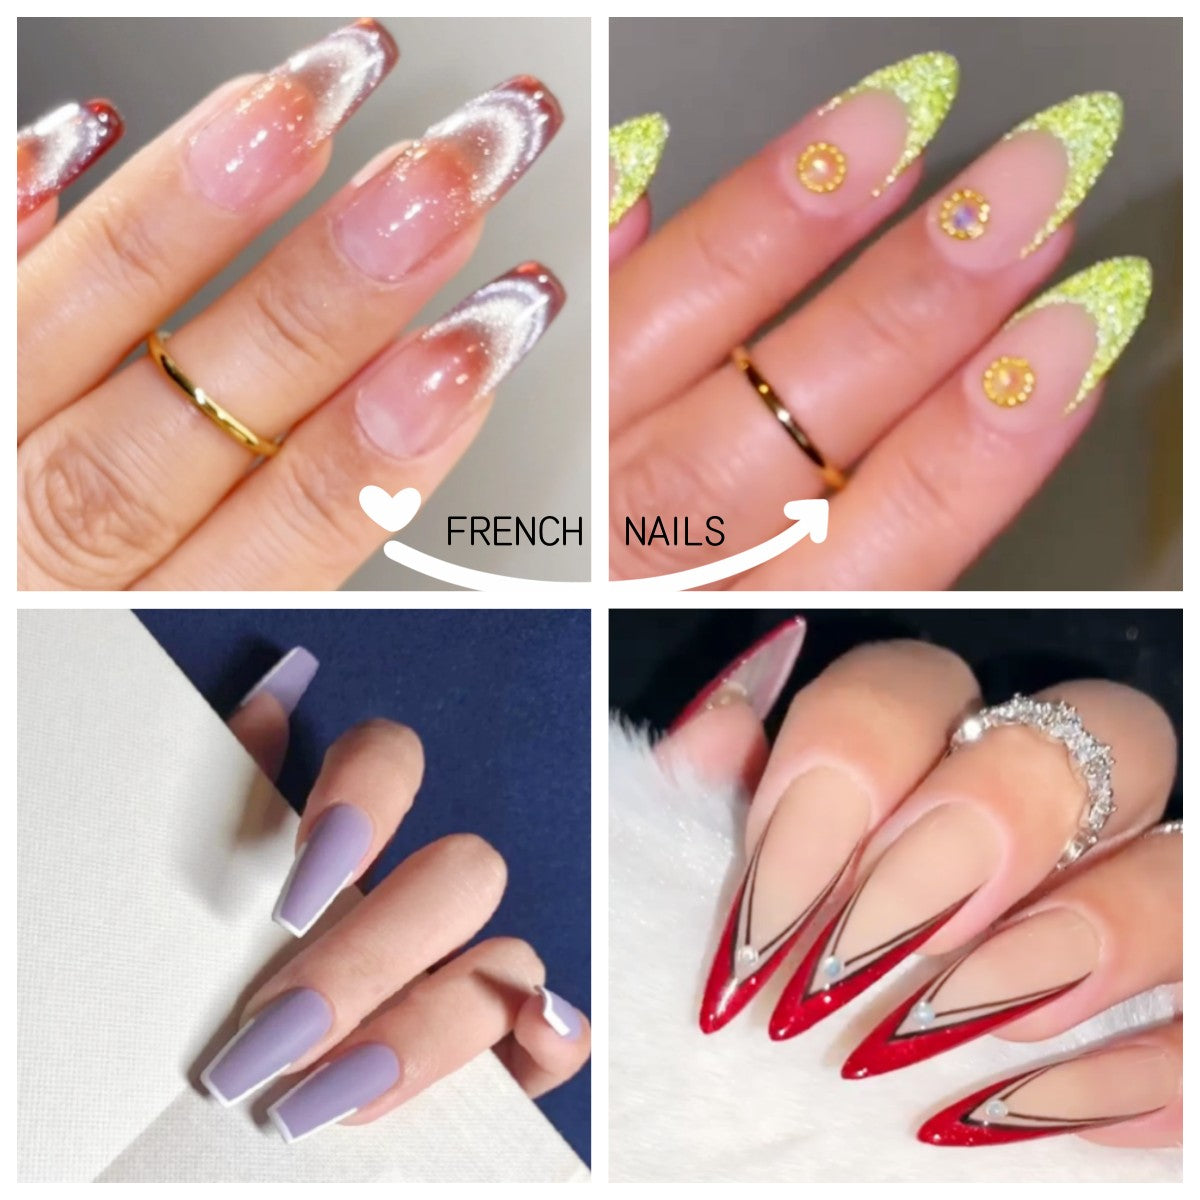
Functionally, this magnetic bar creates similar effects to the cylinder wand, but its flat, rectangular shape offers superior grip and control. Its method of use is very similar to that of cylindrical magnets. But it is less likely to roll or slip from your hand during application, making it an excellent choice for those who want the versatility of a wand with added stability. Furthermore, it is ideal for creating the classic French cat-eye effects.
3. The Essential: Double-Head Magnet

This is the "must-have" tool found in almost every nail artist's kit. It is beginner-friendly and highly effective:
- Rectangular End: Covers the width of the nail to quickly push particles into a classic "slash" or wide-band effect.
- Round End: If you place the round end of the magnet above the wet cat eye gel for 5-10 seconds or move it slowly over the wet cat eye gel, you can achieve hole cat eye effects or curved lines.
4. The Architect: Multi-Function Magnet

Designed for precision and complex designs, this double-headed tool allows you to "draw" with magnetic force. It is ideal for manipulating powder into specific shapes like S-curves, crosses, and intricate French tips. Simply place one end of the magnet above the wet cat eye gel and wait for 5-10 seconds; the cat eye effects will then appear. Be careful not to let the magnet touch the gel. It gives you the freedom to drag the particles exactly where you want them.
5. The Instant Artist: Flower & Stripe Magnetic Pen

Want complex art in seconds? This pre-shaped magnet does the work for you. Simply hover the flower-shaped tip over your wet cat eye gel for 5-10 seconds, and a sparkling floral pattern will instantly appear. The opposite end is designed to create organic, random waves. To master the line cat-eye effect, hover the magnet’s opposite end above the uncured gel. Slowly and steadily glide the magnet to pull the magnetic particles into crisp, defined lines. It is the easiest way to achieve a professional design with zero drawing skills required.
6. The Innovator: Creative Combination Magnet Kits

These magnets represent the next generation of cat eye tools, moving beyond simple lines and slashes to intricate, patterned designs. These sets typically pair a standard, powerful magnet with uniquely shaped metal attachments to achieve novel effects. Begin by using the magnet alone, moving it back and forth along the sides of the uncured cat eye gel. This pulls the particles into the trendy "wide" cat eye effect.
After establishing the base effect, attach the special metal piece to the magnet. Hold this combined tool directly above the nail for 5-10 seconds. The metal piece will draw the particles into the exact shape (e.g., a heart shape, French, or hole), giving a 3D textured look.
💡Tips for getting better cat eye nail effects
There is no doubt that we all want it to have the best effect and be long-lasting when we are creating a stunning cat eye nail design. So here are some helpful tips for you!
• Before applying, remove cuticles, trim the edge, and polish your nails well.
• Applying a thicker coat of cat eye gel can bring you a better effect.
• Hold the magnet as close as possible to the nail for a defined effect.
• Do one nail at a time and cure straight away – that way the magnetic particles are cured into place and don't get a chance to dissipate while working with other nails.
FAQs
1. Can I use cat eye gel polish on my natural nails?
Absolutely! Vettsy's cat eye gel is incredibly versatile. It works beautifully on natural nails, nail tips, acrylics, and gel extensions. Just ensure your natural nails are properly prepped for the best adhesion.
2. Do I need a Base Coat & Top Coat?
Yes—this is a must. To ensure a long-lasting, chip-resistant finish, you need a gel Base Coat to grip the nail and a Top Coat to seal the magnetic particles. Without them, your design won't have the durability.
3. Do I need a specific base color (like black)?
It depends on the cat eye gel you choose.
- Clear-Base Cat Eye Gels: (like our Super Cat Eye or Rainbow cat eye gel) require a "backdrop"—usually black, to make the magnetic shimmer pop with maximum contrast.
- Colored-Base Cat Eye Gels: These are designed to be opaque on their own, though you can layer them over different colors to create unique, custom shades.
4. Can I use a regular magnet?
We don't recommend it. Standard household magnets have weak or inconsistent magnetic fields, which often result in a blurry or "muddy" design. To achieve those sharp, crisp cat eye effects, you need a specialized Nail Art Magnet designed specifically for magnetic gel polish.
5. Why did my design "blur" after curing?
Magnetic particles are suspended in the liquid gel. If you wait too long after magnetizing, the particles will naturally begin to spread out again. Please work one nail at a time. Magnetize your design and immediately "flash-cure" it in your LED Lamp for 60 seconds. This "locks" the magnetic particles in place before you move to the next finger.
Bonus Tip: Avoid curing on a metal table, as the metal can pull at the particles during the curing process!
6. Is it safe to wear cat eye polish during an MRI?
No. Because cat eye polish contains microscopic metallic particles, you should always remove it before an MRI. The powerful magnets in the machine can cause the polish to heat up or create "artifacts" (distortions) on your medical scans. It is generally safe for CT scans, but always inform your technician.
7. Why does my cat eye design look dull instead of "glassy"?
The glassy look comes from light reflecting through the gel. Without a Top Coat, the surface remains slightly porous and a little tacky. To achieve that signature high-shine finish, always seal your design with a High-Gloss No-Wipe Top Coat. It acts like a magnifying glass for the shimmers!
8. Is cat eye gel harder to remove than regular gel?
Not at all. Despite the metallic shimmers, the removal process is identical to standard gel. Simply buff the top shine, soak with acetone for 10–15 minutes, or use a Gel Polish Remover for a faster, mess-free experience.
9. What if I mess up the design? Do I have to start over?
That’s the best part—no! As long as you haven't cured the cat eye gel in the lamp yet, you have infinite "redoes." Simply swipe the polish brush over the nail to redistribute the particles and start the magnetizing process again. It’s 100% beginner-friendly!
How do I remove magnetic cat eye gel?
The secret to a perfect removal is patience. Never peel or scrape hard at the gel, as this can take layers of your natural nail with it.
Step 1: Break the Seal
Use a 100/180 Grit Nail File to gently buff the surface of each nail. Your goal is to remove the high-gloss shine of the Top Coat. This "breaks the seal," allowing the acetone to penetrate the gel layers much faster.
Step 2: The Soak-Off & Wait
Soak a small piece of cotton in Acetone and place it directly on the nail. Wrap your fingertip tightly in a small square of aluminum foil to trap the heat and prevent the acetone from evaporating. Then wait 10–15 minutes. The acetone needs time to break down the gel polymers. If you try to remove it too early, you’ll find yourself scraping too hard.
Step 3: Gently Glide It Off
Remove the foil one finger at a time. The gel should look "lifted" or "crinkled." Use a wooden stick or a Metal Cuticle Pusher to gently glide the softened gel off the nail. Acetone is a dehydrator. Once your nails are bare, wash your hands and apply a generous amount of Nourishing Cuticle Oil. This replenishes the moisture lost during removal and keeps your nails flexible and healthy for your next set.
Marketing Tip: If the polish doesn't budge, don't force it! Re-wrap that nail for another 5 minutes.
After exploring the stunning variety of cat eye gels and mastering the application steps, which mesmerizing effect will you try first?